Filters
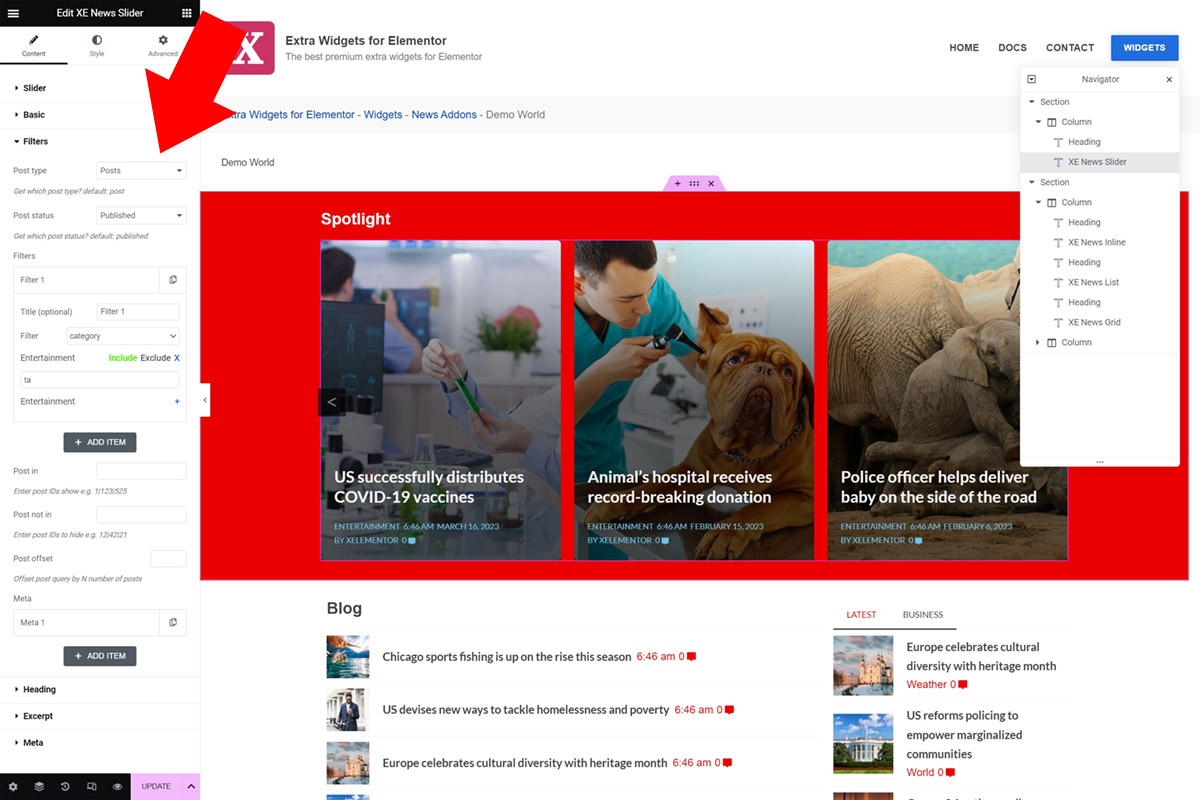
Filters are post query controls like Basic tab is, but extended. Here you can set filtering by categories, taxonomies, adjust more posts loop or even use your own post meta keys. These controls are limitless.

Filters options
- Post type - Choose post type to display. Default WordPress post type is "Posts", but you can create custom post types. E.G. WooCommerce products are a post type, so you can use this plugin to display any post type that has a featured image, content and a title.
- Post status - Default option is published. This means that only published posts can be displayed. However if you need something else, you can use this advanced option.
- Filters - This is the most interesting section. Here you can make unlimited combinations of taxonomy filters, like categories, tags etc. Even custom taxonomies work. These filters will be explained futher below.
- Post in - If you know your post IDs and want to be specific, you can use this option to configure which posts to show.
- Post not in - This option is the opposite of the previous option. It'll exclude posts with set IDs.
- Post offset - Post offset is an option to skip first set number of posts. This can be used if you have like two elements, one shows featured post and then you'd like to continue with a list feed, but you'd like to skip just the first post. Then you'd set here th 1 value and it'll offset the posts loop by 1.
- Meta - Like the Filters this option is interesting. It is used to set the meta query on posts. You can use custom keys, even dates and advanced stuff. It'll be explained in detail below.
Filters (Taxonomies)
These filters are used to query posts by taxonomies, like categories or post tags, but also custom taxonomies.
To start edit the Filter 1. Option to set a title is optional. Follow these steps to setup a basic category filter:
- Click the Filter select box and choose
category. - Now in the
Search termsfield type a few letters to search for category terms. - Plugin will search for resulting terms and display. Click the
+button to add a term. - Now the posts are filtered by category and show only posts of the category you've selected.
- You can notice that there's the
IncludeandExcludebutton as well. - If you set the option to
Exclude, then the query will show all posts excluding the ones that contain this category. - To remove a term, click the
-button. - You can add multiple terms here. So you can filter by
term1 AND term2.
If you'd like to extend the filtering by a post tag follow the next few steps.
- Click the
+ Add itembutton. - Another filter will appear, name it
Filter 2. - Set the Filter option to
post_tag. - Enter a few letters to search for available tags.
- Choose your tags. You can also use
Excludehere, if you'd like to exclude a couple of posts with a tag related to the above category filter. - This is how you set two different taxonomy filters to the same query, so the posts from set
category AND post_tagwill appear.
Custom taxonomies are available. These taxonomy filters are limitless!
Meta (Meta keys)
Meta options are used if you use post meta keys and would like to display posts that are marked with certain keys.
For instance, if you have a key _price in your database (like WooCommerce products have), then you'd be able to set this meta key and an meta value to be higher than 50 which would result in only those posts being shown.
To do this follow these basic steps. Edit the Meta 1 by clicking on it.
- Title is optional.
- Set the
Keyvalue to your post meta key. In this sample we'd use_price. - Set the
Valueto50. Comparefunction in this case would be larger than, so use the>.Typeis set tonumeric. On our post type products, prices are numbers and we'll use this type to compare the larger than function.- This is set and ready to go! Only posts with a higher meta key
_pricethan50will be shown in our posts query.
If you need more specific help, we enchurage you to visit our help center and open a ticket.